Creating Realistic Landscapes in HO Scale
Creating Realistic Landscapes in HO Scale
Creating Realistic Landscapes in HO Scale
Welcome back, railfans!
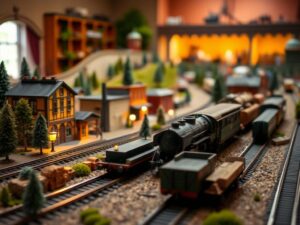
Today, we’re diving into the world of bringing your HO scale layout to life with realistic and captivating landscapes. For those new to model railroading, “HO scale” refers to a popular size standard where locomotives and cars are approximately 1/87th the size of their real-world counterparts. This allows for impressive detail and intricate scenery building!
As exciting as laying tracks might be, truly amazing HO scale layouts come alive with immersive landscapes that transport viewers to another world. But achieving realism isn’t always intuitive â it involves a delicate balance of materials, techniques, and a healthy dose of creative inspiration.
Fear not, aspiring terrain artists! This comprehensive guide will walk you through everything you need to know, from choosing the right base materials to sculpting hills, valleys, and even weathering techniques for that lived-in look.
Getting Started: Building Your Foundation
Before we unleash our inner landscape architects, let’s lay a strong foundation:
- Choose Your Material: Start with sturdy plywood or foam board cut to your desired layout size. Foam provides easy shaping with knives and hot wire tools, while plywood offers rigidity for larger layouts.
- Structure Your Base: Add supports beneath your baseboard (depending on the layout’s complexity) using 2x4s or metal framing. This ensures a stable platform for heavy trains and complex scenery elements.
Sculpting Your World: Mountains, Hills & Valleys
The magic truly begins when you sculpt the terrain!
- Laying the Foundation: Begin with an overall design sketch of your landscape â will it be mountainous? Rolling hills? Use packing foam (available at craft stores), clay or a combination to create raised areas and define natural contours.
-
Shape & Define: Utilize hot wire tools, knives, and carving chisels to refine the shapes of hills and mountains. Remember:
* **Gentle Slopes:** Opt for gradual inclines instead of steep cliffs for realistic visuals. * **Variations in Height:** Play with diverse elevation changes to add visual interest.- Smooth Out Rough Edges: Utilize sandpaper and a smoothing trowel for finishing touches.
Texturing the Terrain: Bring Your Landscapes to Life
-
Layering with Earth: Mix various granular materials like coarse sand, potting soil, or finely shredded bark to create natural variations in your landscape’s textures.
- Creating Rocky Outcroppings: Incorporate larger gravel, pebbles, and crushed rock for exposed rocks and boulders.
- Tamping it Down: Lightly compress the materials using a roller or even a broom handle to create density and firmness.
The Art of Color: Bringing Realism with Paint & Dry Brushing
-
Laying Down the Base: Prime your sculpted landscape with an appropriate acrylic primer (a white base often works well).
-
Watercolor Magic: Watercolors are excellent for creating washes that mimic gradients and variations in soil colors. Use sponges or brushes to apply different hues and blends.
- Dry Brushing Technique: Load a dry brush with light acrylic paint and lightly drag it across the textured landscape to highlight contours, crevices, and rock faces, simulating weathering and age.
Planting the Scene: Add Life With Model Trees and Shrubs
-
Choose the Right Scale: Opt for pre-made model trees or bushes that are specifically designed for HO scale layouts.
- Types & Variety: Mix coniferous trees (pines, firs), deciduous trees (oaks, maples), and shrubs to create realistic clusters and variations.
- Positioning Matters: Pay attention to how different plant types grow naturally in different environments.
Adding Realistic Details: The Finishing Touches
-
Rivers & Streams: Use a flexible acrylic sheet or liquid silicone resin to sculpt meandering waterways.
- Roads & Paths: Create realistic dirt paths and paved roads with modeling clay, styrene strip, and thin sheets of wood.
-
Rocks & Water Features:
* **Adding Texture:** Use textured paints or even actual small rocks and pebbles for added realism around water features like ponds and waterfalls.Maintenance: Keeping Your Landscapes Lush
- Occasional Dusting: A light dusting with compressed air can help remove accumulated dust from your landscape elements.
- Touch-Ups: Reapply paint or dry brush in areas that fade or become worn over time.
Useful Insights for HO Scale Scenery Tips: Where to Learn More
Remember, this is just the beginning! Model railroading scenery is a journey of endless creativity and learning. There are tons of resources available to help you take your landscapes to the next level:
* **Online Forums & Communities:** Join model railroad forums like Trainboard or MrHobo's Depot â a treasure trove of knowledge and inspiration shared by fellow hobbyists.
* **Model Railroading Magazines:** Publications like "Model Railroader" and "Trains Magazine" often feature articles and project plans specifically for scenery building in different scales, including HO scale.
* Books on Scenery Construction: Libraries and online booksellers offer numerous books dedicated to teaching the art of model railroad landscape creation, from beginners’ guides to advanced techniques.
So there you have it â a blueprint for crafting captivating landscapes in your HO scale world! Remember, patience, practice, and a touch of artistic flair are your best allies on this rewarding journey.
Now, go forth and create â your miniature worlds await!


